Windows Tips & Tricks

All sort of Tips & Tricks available for users using Microsoft Windows XP to Windows Vista.Please Rate and Give a comment. Thank You

Thursday, May 28, 2009

Hide Entire Drive from System

Till now you've been trying to hide all your files either using some softwares or using some of the tricks I mentioned in some of my previous posts. Now in this post I am going to tell you how to Hide Your Drives from being shown in my computer. This trick will work only in Microsoft Windows XP. It is a registry trick, so be careful. To do this follow the steps mentioned below:

Step 1: Click Start -> Run and type regedit and click on OK (Note: You need to have Administrative Priviledge).


Step 2: Expand in turn to

My Computer -> HKEY_LOCAL_MACHINE -> Software -> Microsoft -> Windows -> CurrentVersion -> Policies -> Explorer

Step 3: Right Click on Explorer and choose New and then DWORD value.


Step 4: Name the new value to NoDrives. Now double click on it to open the properties dialog box.

Step 5: Select Decimal for the Base.

Step 6: Now enter the values shown for the drives below:

A: 1, B: 2, C: 4, D: 8, E: 16, F: 32, G: 64, H: 128, I: 256, J: 512, K: 1024, L: 2048,
M: 4096,
N: 8192, O: 16384, P: 32768, Q: 65536, R: 131072, S: 262144, T: 524288,
U: 1048576,
V: 2097152, W: 4194304, X: 8388608, Y: 16777216, Z: 33554432,
ALL: 67108863,
NO DRIVES: 0(Zero).


For example if you want to hide E drive, just enter the value in the Value Data to be 16 and click on OK.


Note: You won't be able to hide your Drive C if it is the drive where you have installed your XP.


Step 7: Now exit Registry Editor and Restart your system.

Step 8: In order to access your drive just enter the drive letter as d: in the address bar of My Computer and press enter.


Note with this you can also hide multiple drives. To do so continue to the next step...

Step 9: In order to hide two drives for example D: and F: add the corresponding values as
8+32 = 40.

Step 10: Now put that sum in the value field of the NoDrives dialog box.

Step 11: Exit Registry Editor and restart your system.

Note: Do not change any other settings other than the mentioned above else you may not be able to switch on your system.

Thursday, May 21, 2009

Change Text In Start Button

Are you tired of looking at the same old Green Button with Start written on it??? Want to make some changes or want your name to appear on it??? If yes then follow the steps given below. In order to do this you need to have a software named Resource Hacker. This trick works only in Microsoft Windows XP.

Step 1: Goto your Windows directory, which is generally in C:\windows

Step 2: Make a copy of explorer.exe and name it as explorer1.exe

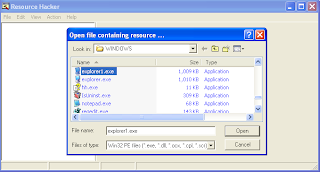
Step 3: Open Resource Hacker and then open this newly created file explorer1.exe


Step 4: Expand String Table -> 37 -> 1033


Step 5: In the right pane you'll see something like 578, "start", now instead of start give Your Name.

Step 6: Click on the Compile Script button and then click on File -> Save then exit


Step 7: Click on Start -> Run -> regedit


Step 8: Expand in turn to My Computer -> HKEY_LOCAL_MACHINE -> SOFTWARE -> Microsoft -> Windows NT -> CurrentVersion -> Winlogon

Step 9: Double click on Shell in the right pane and change the value from explorer.exe to explorer1.exe

Step 10: Exit Registry Editor and reboot your system.